Knowing how to set up your tent and campsite quickly and effectively is a major aide to a great camping trip.
Camping is a great way to reconnect with friends and family while also disconnecting from the stresses of modern life. With affordable pricing on campsites and lots of trails, it is a great vacation destination.
How do you set up a tent and campsite? To set up a tent and campsite, you will need to:
- Find the right tent for your needs
- Practice setting up your tent
- Purchase all your cooking needs
- Learn how to start a fire
- Research the campgrounds for restrooms and washroom situation
With this knowledge under your belt, you’ll be ready to face the great outdoors! So, read on to become a camping expert.
Tents
Tents have come a long way since the initial “tarp on a string” design. Some tents even have built-in air conditioning – sort of. Whether you are trying to set up a classic A-frame tent or the impressive 12-bedroom fantasy tent, there is a specific type for each camper’s needs.
Here are the five main types of tents you should consider when setting up your campsite.
Note: Please follow this link for a much more detailed explanation of the relative merits of How to Choose a Family Tent For Your Family. This is just a quick pass through some of your options.
Ridge/A-frame

When someone says the word “tent,” this is the design that comes to mind. Ridge (or A-frame) tents are a basic design created for campers who like to keep it simple.
Design and materials have moved on. For family camping trips, an A-Frame tent is not a top option.
Dome
If you’ve been out camping before or have watched a show where the characters go camping, you’ve seen a dome tent! These types of tents have a zipper front door and canopy (also known as a “rainfly”) that stretches over the roof of the tent itself.

They’re great for any level of camping experience. They’re super easy to setup and are great in wind and poor weather. Modern, lightweight materials mean you can get a lot of tent without it getting too bulky when packed.
Dome tents are the go to starter tent for family camping. You can get a dome tent for anything from 2 – 12 people. Many of them provide multi-rooms with separate bedrooms, mud room and screen rooms.
Geodesic
Geodesic tents are very much like dome tents. They have a similar overall structure (especially with the roof design) but tend to have many more, interlocking, triangular panels. Geodesic designs are inherently strong.
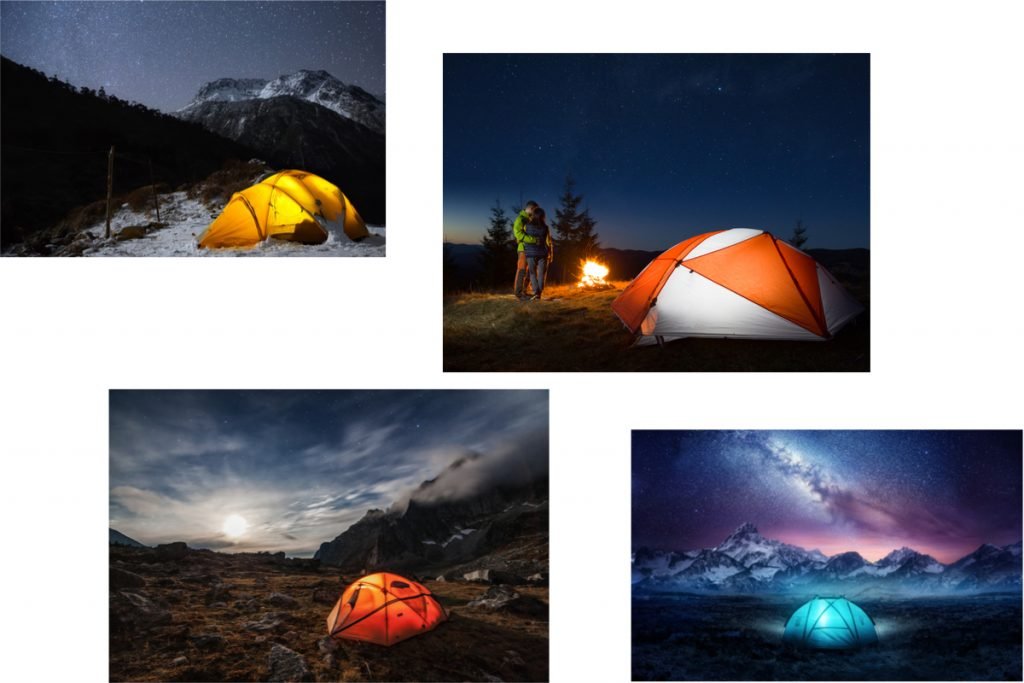
Geodesic tents handle the weather – particularly strong winds and snowfall, very well. For this reason they tend to be used for more specialist expeditions such as mountain climbing. Many of the tents in the Everest basecamp are Geodesic.
To make use of the inherent strength in the geodesic design, these tents have more guylines, anchor points and poles. They can therefore take longer than an equivalent dome tent to setup. It will keep you safe and secure in anything less than a hurricane though.
Most importantly, they look impressive when you set them up!
Sadly, Geodesic tents are not great for family camping.
Cabin Tents
The name ‘CabinTents’ comes about because of their shape. They are designed to look a little like a cabin.

Spacious and Comfortable Ozark Trail Hazel Creek 12 Person Cabin Tent,with Two Closets with Hanging Organizers,Room Dividers,Mud Mat,E-Port and Rolling Storage Duffel for Convenience
Cabin tents tend to be bigger and heavier and are therefore a bit more difficult to transport. They are also a little more difficult to erect so tend to be favored by slightly more experienced campers.

CORE 9 Person Instant Cabin Tent
In our experience, many families start out with the easy to use dome tents, and then move onto a cabin tent. The weight and size of the packed tent, and the slightly more difficult set-up, is more than offset by the increase size and the more usable shape.
Multi-Room Tents
Multi-Room tents are not really a category of tent. You can get both dome and cabin tents with multiple rooms. In fact, if you have read our “Awesome Tips to Comfortable Family Camping” you will know we strongly recommend that you at least consider a multi-room tent.

fortunershop Family Cabin Tent 14 Person Base Camp 4 Rooms
Multi-room tents are exactly what they sound like; they are tents that are built to have multiple rooms in them! They are incredibly family-friendly and are designed to withstand the needs of a minimum of four people.
Dome and Cabin Tents
While we have quite happily called tents dome and cabin, in reality it can be very difficult to differentiate – particularly as you get to larger, multi-room tents. Simple dome tents are always going to be easy to spot. As soon as you move onto multi-room tents it all gets much less clear.
Don’t let it worry you. For the most part it’s only a marketing term anyway.
General Tips
For setting up your tent, several elements can figure into the build. From trying to get the aluminum poles to stay in the ground to stretching the rainfly enough to be useful, it can be a bit overwhelming to try to figure out on your arrival day.
Instead of wasting the first half of your check-in day fighting with the tent, here are some tips to make setting up your tent go smoother!
Practice in the Backyard or a Park
If you have the room in your backyard, utilize it! If there isn’t any room in your backyard (or you don’t have one), consider visiting your local park to practice setting up. Just be sure to ask a Park Ranger before you start pitching your tent. Most public parks have specific areas where they allow tents to be set up; typically, there will be a sign.
Each tent will have its instructions for the best way to set up your tent. It’s essential to follow them as much as possible to ensure it won’t collapse on you halfway through the night!
How to Set Up a Tent
Although every tent will have unique needs for its setup, here is a simplified guide from the National Park Service that should get you started in the right direction!
- Find a Flat Ground- You don’t want to set up your tent on any hillsides or other uneven surfaces. Not only is it bad for your back while you sleep, but it can also make your tent more unstable and more susceptible to blowing away with the wind.
- Remove All Debris- Any pinecones, branches, large rocks, or other natural elements that can make the floor of your tent bumpy or raised should be removed. This will help make sleeping arrangements go much more smoothly (literally!), and it will help reduce the risk of tearing your tent.
- Check the Soil- Before you start setting up your tent, put a stick vertically into the ground. If it comes up slick or muddy, do not set your tent up here! It’s a sign of where the water naturally flows, and you don’t want a soaking wet tent.
- Read the Instructions Thoroughly- More than likely, your tent will come with an instruction booklet detailing each step. Be sure to read it in its entirety as there may be special needs that have to be addressed, such as different terrain, extra poles, and ground cloths (like a tarp for the bottom of the tent).
Where to Set Up
The location of your tent is also an important aspect that you should consider when you first arrive at the campsite. If the campsite you are going to has a well-defined perimeter, commonly known as a “front country campsite,” there should be a picnic table and fire ring.

If this is the case, you should set your tent up as far away from the picnic table as possible. This is to reduce the risk of bugs and bears finding their way to your sleeping area by following their noses to the food.
If you are camping somewhere without a specific campsite perimeter, also known as “backcountry camping,” then it becomes increasingly important to define which areas will have food in them. The further from established areas for humans you are, the higher your chance of attracting bears to your backcountry campsite.
The rule of thumb for setting up your tent is a minimum of 200 feet away from your food source.
Along with where you will be storing your food, you should be aware of your surroundings. If you are going to be camping near running water, you should prepare as if the body of water could flood at any moment. Your tent should be a minimum of 500 feet away from a body of running water. If there is a hill nearby, this would be the only time you should try to set up your tent on the hillside. It’s better to be uphill during a flood than downhill.
Direction of Doors
The direction of the tent doors, and the orientation of the tent, in general, is entirely up to the individual and their needs. There is no right or wrong way to orient the tent doors for camping.
In summer, when your priority is likely to be to keep the tent cool, we recommend orienting your tent doors to line up with any prevailing winds. This way you can get the most out of any ventilation available.
Here is a quick guide to help steer you in the right direction if there are certain aspects of camping you are looking for:
Finding the prevailing winds
Finding the direction of the prevailing winds will take a bit of research. Fortunately the U.S. Department of Agriculture Natural Resources Conservations Service has a database to help you figure out which way the average wind is blowing.
If you want to wake up with the sunrise:
You’ll want to position your tent doors to the east. If you didn’t already know, the sun rises in the east and sets in the west. Because of this, setting your tent up, so the doors face east will cast bright sunlight into your tent right at dawn. This will give you plenty of time for activities and make it easier to wake up!
If you want to sleep in a bit:
You’ll want to position your tent doors to the west. This will keep the rising sun out of your face for a bit longer, and (assuming you’re a night owl) give you the chance to watch the sunset!
Cooking
If you’re not glamping in an oversized RV with a fully functioning kitchen, it can be a bit confusing on what to cook while out in the wilderness besides sugary campfire snacks. Unfortunately, you can’t survive off s’mores alone! So, when it comes to camp cooking, there are a few staple ingredients you’ll want to add to your shopping list.
Essential Camping Food Items You Should Have
Before we get into the specifics for each meal, there are some essential food items that you should have already packed in a container.
- Canned food- In case
you can’t get the fire going from too much rain, or you want to experience
the “roughing it” style, canned food is a must-have for all
occasions.
- Recommended: beans, veggies, fruit, and a can opener
- Crackers- Such a
simple snack, but it’s always looked over! Crackers are great for a quick
pick me up or add-on for soups. They’re also great to bring for hikes!
- Recommended: Unsalted, as you will most likely be moving often while camping. You don’t want to dehydrate yourself.
- Peanut Butter and Jam- Even though jelly is better, jam is safe for warmer
temperatures without spoiling. These are a staple for elementary lunch and
could help give you an energy boost when needed.
- Recommended: Extra crunchy peanut butter. It has more protein!
Breakfast
Here are some ideas for breakfast foods you can make while camping.
- Scrambled eggs
- Omelets
- French toast
- Pancakes
- Cereal
Lunch
Here are some ideas for lunch foods you can make while camping.
- Trout pockets
- Stew
- Chef salad
- Turkey sandwich
Dinner
Here are some ideas for dinner foods you can make while camping.
- Mountain pies
- Rice and beans
- Chili
- Breaded chicken strips
Remember to keep all food items in the designated food area and out of your tent!
Campfire
Not only is it one of the most exciting things to do while camping, but it would also be impossible to cook without the campfire! Whether it’s your first time camping or you’re a seasoned pro, there are a few things you should consider adding to your fire-starter kit.

Basic Campfire Needs You Should Have
Every camper should have the following items in their inventory for fire-starting:
- Dry wood- You may have to go scouting a bit to find some useful, dry wood logs.
- Large rocks- If your campsite doesn’t have an already established fire ring, gather some large rocks to help maintain the fire perimeter.
- Bucket of water- Or a gallon jug of water will do. It’s a proper precaution to have next to the fire pit.
- Dry kindle- Kindle is essentially twine and other shavings from wood that are thin enough to catch a flame faster. These will be the fire-starters.
- Tip: If you can’t find any kindle, you can make some by shaving a wooden log with a knife.
- Lighter- It can be a cigarette lighter or a long wick one. You can even use matches. Regardless, the point is to have a spark.
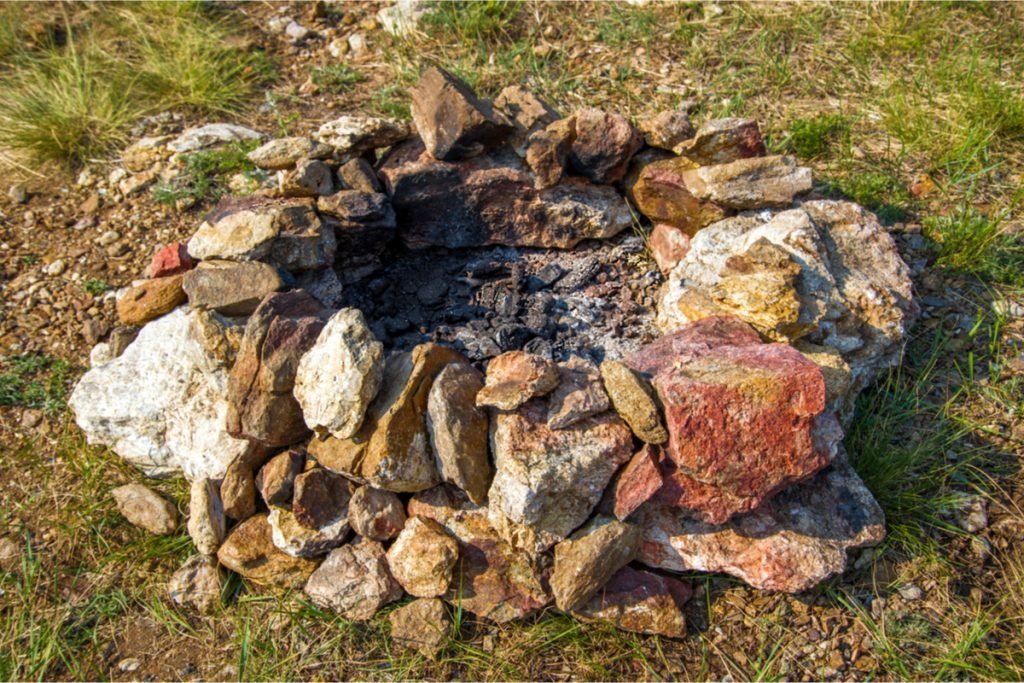
If you are going to be cooking on your campfire, it needs to be setup pretty carefully. Take a look at our article on “How to Build a Campfire for Cooking”
How to Start a Fire
Now comes the fun part: making a fire! If this is your first time starting a fire while camping, follow this six-step guide!
- Place a piece of kindle in the middle of the fire pit.
- Light the end of that kindle.
- Place the rest of the kindle on top of the lit one.
- Blow lightly until a small flame begins to catch.
- Once the flame grows to overtake the
kindle, gently place two wooden logs over the kindle in a triangle
fashion.
- The goal is to create enough room for oxygen to feed the fire.
- Continue to gently blow on the growing fire and add kindle as needed.
If you need a quick burst of flame to help get the fire going, you can use dry leaves.
Restroom
Depending on the type of campground you stay at, there may be defined restrooms available to you. If that’s the case, be sure to bring toilet paper – just in case.
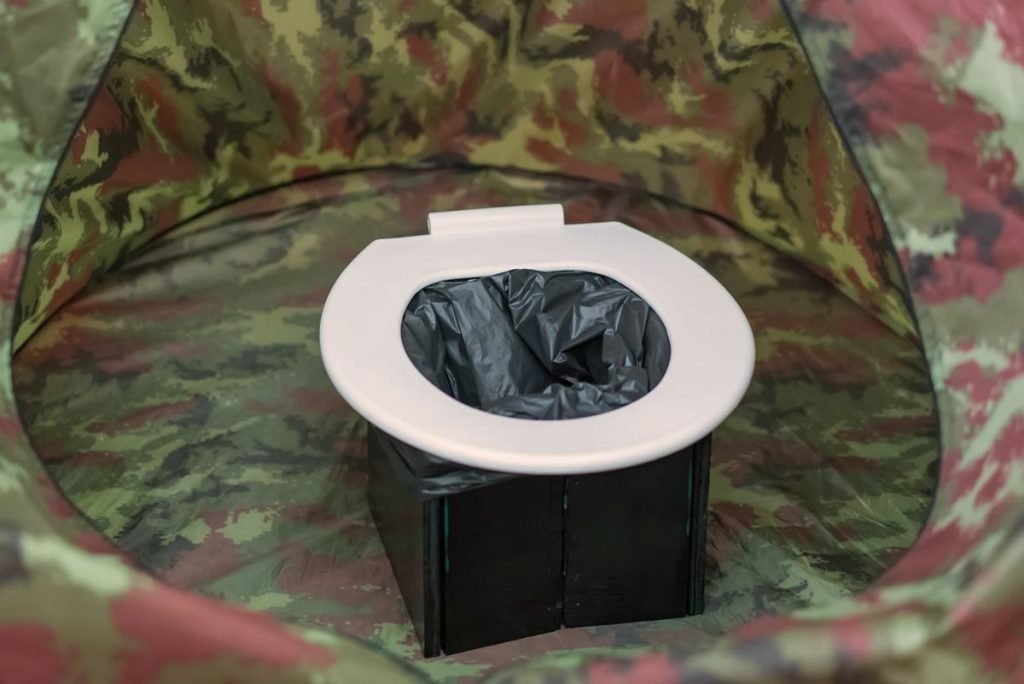
If you are going a little more off track, dispersed camping you won’t have restrooms or bathrooms. There are pretty strict rules for toilets while wild camping. All solids must be buried at least 6 inches deep. Paper must be taken away for disposal elsewhere. You may like to invest in a portable toilet.
For camping, here are three possible portable toilets you could purchase:
- Basicwise Portable Travel Toilet for Camping and Hiking
- Camco Portable Travel Toilet-Designed for Camping
- Alpcour Portable Toilet
We’ve tried portable toilets. We hate them. They are big and take up too much room in the car. They need emptying and cleaning. It is not a job that anyone really wants to do.
Our approach is to dig a deep latrine hole and set it up as a toilet. At the end of the trip we fill in the hole.
Washroom
A washroom is essentially like a communal shower location. That doesn’t mean you’ll be sharing a stall with your campsite neighbor, but there’s a good chance hot water will be scarce. It is also a possibility that your campsite may have restrooms but not washrooms. Always check the campground website for amenities before booking!
Things You Should Bring with You
Besides your change of clothes, here is a list of things you should bring with you when you use a campsite washroom:
- Flip flops- There is lots of mud, bugs, and general nasty things that people will be bringing with them to wash off in the showers. Avoid letting your feet pick up any bacteria that could lead to athlete’s foot or other foot fungi by wearing flip flops while you shower.
- Shower Caddy- In most cases, campsite washrooms are located far off from the main campgrounds. A shower caddy will help with the transportation
- Shampoo, Conditioner, and Body Wash- Unlike other public washrooms, campsite washrooms do not offer shampoo or any other body washes. So, you’ll need to bring your own. It wouldn’t hurt to bring a body wash that has salt or sugar in it to help get the grime off your skin!
- Two Towels- Yes, two towels specifically! One for your body and one for you to step on when you get out of the shower. The goal is to have the least amount of contact with the wet floors as possible.
In Conclusion
Camping is tons of fun and a great way to incorporate exercise back into your life. With hiking, fishing, and the general movement of it all, it will challenge your mind and body to get back into rhythm with nature.
However, you shouldn’t have to deal with nature more than you need to! So, be sure to keep food 200 feet away from your tent and know what you need to bring with you in the showers to make sure your camping trip is memorable for all the right reasons.
4 Responses